Thursday, February 25, 2010

Day 14 - Pipe, Demo, Debris . . . But No Jackhammer!

Hi readers,


Day 14 was a full, busy day here at Remodeling 1070. Things started early with the plumbing team back to lay and wrap more PVC. There was lots of banging, an hour or so of no water, and a sudden need for a large shovel, but luckily, no jackhammer. Plus, today we had some good, classic rock radio blaring, so it was productive AND entertaining.


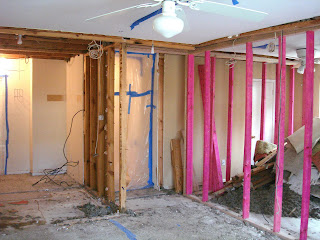
Plumbing carried us through until lunch, when that team was replaced by our framing guy, who finished the afternoon by taking out more sheet rock to open things up for the electrician, who comes tomorrow. More sheet rock came off the outside wall of the master bath and now second master closet, and by the end of the day, ALL of the ceiling sheet rock in the master suite was demolished.


Yes, we have debris. Just check out the photos below!


Tomorrow will start with the electrician in the morning followed by a visit with our general contractor, Matt, to review where we've been, what's coming next and a few changes and design adjustments. All in all, it's been another great week here at Remodel 1070. Next week is Week 4, which means by next Friday, we will have logged our first full month of renovations.


Well, at least we know the new master bedroom closet can hold two old doors, two ceiling fans, lumber and some power tools. That should almost be enough room for most of my shoes.
A sort of long view of the two master closets. Note the complete lack of ceilings . . .
A nice view of the radiant barrier :)
Debris pile #1 - former ceiling insulation
Debris pile #2 - The former ceiling, surrounded by mystery bags (I poked them and nothing made a sound or poked back, so I'm pretty sure it's just more debris).


Wednesday, February 24, 2010

Day 13 - A Little More Jackhammer, A Whole Lotta PVC

Happy Hump Day,

It was another loud but very productive day for Remodeling 1070. It started with a literal jolt with some additional jackhammer work. I decided to take a page from our dogs' book of coping skills. After mildly freaking out yesterday at the sound of the jackhammer, they barely lifted their heads when today's assault commenced. I imagine they used primitive reasoning to deduce that, "Hey, I know that noise. It doesn't hurt me, walk me or feed me. Peace out."

The jackhammering only lasted about an hour. It was quickly replaced by scraping, pipe fitting, some cool metal tunes and some good old fashioned, salty worker banter. The end result is what you see below: all the new PVC pipe in the master bathroom. Aside from the sealing compound that smells faintly of rubber and almonds, it all looks great.

We're scheduled for a bit of plumbing clean up tomorrow and some possible adjustments to some of the PVC from today. Friday, we are doing a walk through with Matt, our general contractor, to take a look at the master suite and make sure everything is laid out the way we want before the workers really get to the meat of putting the rooms together. We're pretty sure we want to make a few small design changes, so we thought the contractors would like us a whole lot more if we identified those changes sooner rather than later.

As always, enjoy the photos. Sorry, there is no huge pile of debris today.


Tuesday, February 23, 2010

Day 12 - Jackhammer Day!

Hello readers,


I hope everyone had a good weekend. I wanted to wait to do this update as Days 10 & 11 were pretty much devoted to cleaning up the details on the frame work, which looks really terrific.


Week 3 really kicked off today with Jackhammer Day. The plumbing team arrived this morning and proceeded to spend about 3 hours breaking through the old terrazzo tile bathroom floor, the old shower floor and parts of the slab. As you'll see from the photos below, we have two trenches cut into the slab, and, of course, a pile of debris. If you look closely at one of the photos, you can see a hole in the back wall of the shower where a pipe used to lead outside (now you can literally stand where the shower used to be and spy on the dogs in the back yard without using a window).


Tomorrow, the plumbers return to do some clean up and to start resetting pipes and drainage to fit the new master bath layout. As with any renovation, we are making a slight adjustment now that we see the space progressing. We originally planned for a 6' x 6' shower, but that turns out to be quite an overpowering use of the bathroom space. We are now thinking we will do a 6' x 5' shower, using the 6' for length and narrowing to 5' for width to give more space between the shower and the countertops and cabinets. We are also planning to build a bench seat into the shower stall.


Enjoy the destruction photos below, and behold the power of the jackhammer!


Saturday, February 20, 2010

We Survived Week 2 - Here's to Week 3


Happy Saturday, everyone.

Week 2 of Remodeling 1070 is complete. At this point, all of the framing for the master suite is in place, and we're ready to start the next step: mechanicals. Week 3 will kick off with a day of clean-up and detail work. Then the rest of the week will be dedicated to dropping and placing all the wiring and cables in the master suite and also bringing in the plumber to start his part of the new master bath.

We did another part of our homework last night and picked up a handful of paint samples. You have to love the names the manufacturers give to all the different shades. For example, we're considering light to medium gray tones for the master suite with color names like Moondance, Charcoal Heather and Gravity. If someone asked you to describe the color of gravity, where would you even start? Something tells me it wouldn't be with gray. Gravity makes me think of falling, which makes me think of pain, which somehow doesn't translate into pale gray. LOL. And for the record, Gravity is not produced by the same paint company as Moondance, so the space theme does not apply. :)

For accent walls, I happen to like Deep Sea Diving. It's a silly name for a paint, but as a rich shade of blue, the name at least is relevant to the color.

By far, my favorite is one of the neutral shades we've chosen for the main, shared rooms of the house. It's called Dust Bunny. Now that's a color I can get behind. Any paint that perfectly aligns with my housecleaning skills is a clear winner. Sadly, the paint name doesn't do the color much justice, as it's a very warm, creamy tan color (that will look great with a Deep Sea Diving blue wall here and there). Bungalow White is the other neutral shade we like, though it just won't be as much fun to say when we have our open house party. I'm really living for the day we invite people to see the finished product and I can say things like, "Yes, we have some gravity in the master bathroom, and you can go deep sea diving in the den, but the rest is pure dust bunny. Please, have another cocktail weenie."

I live for the simple things . . .

Below is a so-so photo of the paint samples.

Top left trio: Deep Sea Diving is on the far right.
Top right trio: Gravity is in the center (where else would it be?).
Bottom left trio: Dust Bunny is center, Bungalow White is right.
Bottom right trio: Moondance is on the left.

Thursday, February 18, 2010

Day 9 - More Framing...nearing the end

Today was a full day with the power nail gun. I don't think there's a print or piece of artwork hanging anywhere in the rest of the house that isn't tilted at least two inches off center, but that just sort of adds to the charm of the mess. Its like living in a Picasso painting, only dustier.


Our cleaning woman saw and cleaned the house earlier this week for the first time since Remodeling 1070 started. I was so concerned that she would freak out, but she was excited to see what we had done, loved the concept and said, "Eh, some of my other clients are doing the same thing. I've seen worse." And with that, she grabbed her bucket of products and never missed a beat. She's my new hero. Hers is the kind of attitude I need to embrace more often.


There are more photos below for your viewing pleasure. I can hardly wait to see what progress gets made as we head into Week 3!


This is the wall of the main master bedroom closet as seen from the back wall of the bedroom - looking across the length of the room. You can see the center gap in the studs where the closet door will go. The taped off door in the background will be replaced with solid drywall and will be the back wall of the closet (facing the hallway).
The left side of the photo is a partial view of the second master closet, though you can see the outside wall on the left that will butt against the guest bathroom. The double stud in the center represents the wall separating the second master closet from the master bathroom. If you look to the left of the window at the brown stud in the background - that is the original width of the master bathroom. We've really added some serious square footage to the master bath.
The left side of the photo is the corner of the wall separating the master bath from the second master closet. The right side of the photo is a the wall and doorway into the master bath.
This is a slightly brighter view of the second master closet, which is the left side of the photo, and the master bath, which is on the right.
And yes, you guessed it: today's final photo is the day's yield of debris. As you can see, we are in the Olympic spirit and clearly competing for gold.


Wednesday, February 17, 2010

Day 8 - Framing

Hello followers,

Happy Hump Day. Today was Day 8 of Remodeling 1070, and it was an active one indeed. No midweek slump here. A lot more framing got done, the plumber returned to do a walk through, and the electrician paid a visit to help move wires around some of the framing to get things in position for when the wires get dropped down behind the drywall, which may start being hung as early as next week.

Enjoy the photos below.

This is a view of the new entrance wall and doorway into the master bathroom from the POV of the master bedroom.

Still from the POV of the master bedroom, and just to the left of the entrance to the master bathroom - this is the new wall of the second master closet. You can see where the closet door will be toward the left side of the photo. If you look down at the floor level and the missing chunk of carpet, you can also see that the original wall was further into the master bedroom, so we are gaining just short of 2 feet of space for the bedroom.

Turning just a little further left, still standing in the master bedroom, you can now see that the original entrance to the master bedroom has been obliterated. Again, we are also gaining 3 feet of extra bedroom space in that direction.

Here's a view from the POV of standing in what will be that second master closet, facing into the master bedroom and the big empty space on the right that will be the main master closet.

You know it wouldn't be a blog entry if I didn't include the obligatory photo of the day's carnage. I can't believe how much debris keeps coming out of these same rooms!


Tuesday, February 16, 2010

Days 6 & 7 - Plumbing and Framing

Hello readers,

Yes, I missed a day of posting, and for that I apologize. Yesterday was scheduled to be the big framing day for the master suite - Day 6 - but the framing pack couldn't be delivered until this morning. A slight bump in plans, but Day 6 was still productive, as the plumbers returned to replace the flex lines on the water heater. A previous plumbing inspection earmarked one of the flex lines as being corroded to the point of becoming "a flood just waiting to happen," so we're relieved to have the repair off the to-do list.

Remember, we are two grown men now sharing one bathroom with a teenage daughter. No one has needed a prescription yet, but the the thought of three of us sharing a non-working bathroom has prompted me to keep Walgreens (and the Four Seasons) on speed dial.

Today, however, Day 7 - Framing, went off without a hitch. Matt and the workers delivered the framing pack, reviewed the plans and took a few measurements to mark off boundaries. The rest of the day was tearing out carpeting and lots of framing studs getting set in place with one loud, wall-rattling nail gun. The master suite rooms are starting to take shape, and we can now start to visualize just how much bigger and better laid out the space is going to be.

Below are some photos from today. Based on feedback from many of you, I'm posting individual photos with more detailed explanations. We've heard that the slide shows don't always open for all readers, and that the photos are pretty small, which makes details difficult or nearly impossible to see. Hopefully, these larger photos and explanations will be the ticket.

Enjoy. More to come tomorrow!!

This first photo shows the framing for the new entrance wall into the master bath. As you can see from the top to bottom vertical brown stud in the center of the photo, we are adding about 3-1/2 feet to the depth of the bathroom. That brown stud represents where the original master bath wall was.

This marking on the wall of what used to be the bedroom adjacent to the master displays that the width of the master bathroom will now be 11 feet, which is nearly 4 feet wider than the original room.

This is a view into the bedroom adjacent to the master, taken from the POV of standing in what used to be the hallway between the two bedrooms. The framing shows the new wall that will separate the second bathroom, which is to the left of this photo, and the new second walk in closet of the master suite (which is the repurposed adjacent bedroom). As you can see, we are also making the second bath a few feet wider as well as extending the master bedroom a few feet.

This is another view of the same wall pictured above, as taken from the POV of the master bathroom.

Look, no ceilings. Half of the ceiling has been demolished in what will now be the second master closet, and the entire ceiling is gone in what used to be the only master closet and hall closet (which are being repurposed into extra bedroom space and a bigger master closet).

Of course, no day of Remodeling 1070 would be complete without the end of day heap o'debris. It's a mess, but I can't tell you how great it is to start seeing that worn, stained carpet start to disappear. I can almost begin to smell the new wood floors . . .


Sunday, February 14, 2010

The Doors

Happy Valentine's Day to all.

Well, readers, we have chosen our doors. I have to say, it was a bit of a surreal experience shopping for doors online. There's a good portal joke in their somewhere. That said, while surreal, the online experience really DOES make parts of this project so much easier. The ability to do the lion's share of research from the semi-comfort of your half torn-apart home is a definite plus.

Per the recommendation of our general contractor, Matt Harris, we spent a few days looking at the door options on the Masonite website (www.masonite.com) and came up with the choices listed in the links below. It's kind of cool to look at these doors, particularly the exterior doors, and realize that they are made from a type of fiberglass. They look like traditional wood but have the benefit of being more durable and weather resistant. They are also all paintable and stainable, so we can change up colors and/or wood finishes any time.

http://www.masonite.com/productPages_EntryDoors_Detail.php?doorID=FG-BMT-DR-404-366-X-1-80
This is our choice for the front entry door. We will have a mail slot added, and the hardware will be matte silver or brushed nickel.

http://www.masonite.com/productPages_EntryDoors_Detail.php?doorID=FG-BMT-DR-122-999-X-XX-80
This is our choice for the back entry door off the utility room and also for the deck entry door to the master bedroom. Again, the hardware will be matte silver or brushed nickel.

http://www.masonite.com/productPages_InteriorDoors_Detail.php?doorID=PAN-MPS-DR-6PWH-XXX-6-80-HBD-TX
This is our choice for all the standard interior doors, again with the same style hardware. We are going to choose the option of having these doors filled with straw to make them more soundproof and energy efficient. We will paint the interior doors according to the color schemes we choose for their prospective locations in the house. We don't want to just uniformly paint them all white or off-white.

Week 2 of Remodeling 1070 starts tomorrow. I will definitely have new photos this week, as the framers will be here. The master suite will start to take shape!

Okay, go enjoy your flowers and candy or, for those of us who avoid all the red and pink, go watch the Olympics!

Friday, February 12, 2010

Day 5 - Plumbing

Happy Friday!

Yes, today marks Day 5, the final day of our first full week of Remodeling 1070. I am very happy to report that the workers finished the demolition phase of the master suite yesterday. Today, our general contractor, Matt, will be bringing in the plumber to cap off the pipes in the master suite and also fix the water heater issue mentioned in yesterday's post. That should all be completed today.

Our homework this weekend is to start narrowing down choices for interior doors, entry doors, windows and paint. Matt is recommending Masonite doors for both interior and entry, and I've spent some time on the website (www.masonite.com). Matt is going to take us to another project he completed to show us the windows he recommends. I think the doors and windows will be easy. The paint samples will be more of a challenge. We are pretty sure we know what we want for the master suite and the second bathroom, but we're up in the air on the rest of the house. I guess it's time to go back to the design book and get some inspiration :)

We will kick off Week 2, Day 6 of Remodeling 1070 next Monday with the framer building out the new master suite design.

I don't have any new photos to share today, but if we make some more material choices this weekend, I will try to provide photo samples of whatever we choose. Have a great weekend, and look for another post on Monday.

Thursday, February 11, 2010

Day 4 - Plumbing and Framing

Good morning readers,

It's Day 4 of Remodeling 1070, and I am just amazed at the progress this week. I've attached another slide show presentation for your viewing pleasure. This one documents the work from Day 3: the tear out of the hall closet and the master bedroom closet. Part of this space is going to be repurposed as additional square footage for the master bedroom, while the rest is going to be a new and improved master bedroom closet. The bedroom adjacent to the master is going to be repurposed partially into the expanded master bath and partially into a second large, walk-in master closet.

According to Matt, our general contractor, the plumber and framer should be here today and tomorrow. The plumber needs to do a quick fix on a water heater issue, and will then cap off the master bath pipes so the reconstruction work can begin. The framer will be going through the demolition area and, obviously, framing the new layout of the rooms/closets. By early next week, what is now just open space should strongly start to resemble the new template for the master suite. It's pretty exciting.

I'm off for now. Look for another update tomorrow.


Wednesday, February 10, 2010

Day 3 - Clean Up

Good morning all,

It's a rare quiet moment here at 1070. The workers have yet to arrive, so I thought I would take this pocket of sanity to post just a short review of yesterday. Day 2 was all about clean up from Day 1. All the debris that was pictured in the previous slide show was hauled away yesterday, so now those back rooms truly look demolished and empty. I've attached a brief slide show so you can see the results of clean up day.

We're not sure what's in store for today, but as always, I will follow up here and let you know how things are progressing. There may be some additional clean up today, but I'm hoping by the end of the week and beginning of next week, we will be well into framing out the new room design.

I do know that we'll be starting to pack up the family room this weekend, and we'll be shopping for doors, windows and looking at paint samples. I've now gotten to the point where I can't enter any building without immediately starting to evaluate color schemes and finishes. I can stand at the paint center at Home Depot for HOURS . . .

Enjoy the slide show below. More to follow.


Tuesday, February 9, 2010

More Shopping Results


Hello again readers. Two posts in one day. I'm really going to try to post something every day now that the work has begun. Something tells me we'll have no shortage of photos and stories to share now that the walls are coming down.

As you know, the shopping trips for materials continue. In fact, Matt wants us to step up the process and make the rest of our design choices so we c
an get all the materials on order and in storage so that we have instant access to everything as each phase progresses.

Below are two photos of some of the tile we will be using in the master and second bathroom. The blue round tiles are called bubble tile, and these will be used in the second bathroom for accents, borders and decorations. These will be paired
with white subway tiles for a really clean, bright room. The bubble tiles will help pull more of the blue tones out of the blue/gray counter top
in this bathroom.

The second tile is called Fusion Clear, and it will be used for the walls of the master shower. The photos doesn't nearly do the tile justice. It is an iridescent white with a silvery glaze that captures light and reflection and displays a lot more
depth and color than you can see here. We actually got to see this tile on a full wall as a display, and it's pretty darn amazing. The silver will work really well with the dark gray floors, pale silver/gray paint and gray/blue counter tops we've chosen for the master bath.


Day 2 - The Games Got Off to a Great Start

Well, readers, we survived Day 1 of Remodeling 1070. Day 1 was all about demolition, and I've included a brief slide show to highlight the end result of a full day of deconstruction. Clearly, there's no turning back now . . .

The workers arrived bright and early today at 8:15am to continue the process of dismantling the old master and adjacent bedroom and turning it into what we hope will be an amazing master bedroom suite. I know it's difficult to visualize the end result, especially when you see the demolition piles, but I like to imagine each bang of the hammer and crash of drywall and tile as a small victory toward the simple pleasures of having a shower I can turn around in without bruising my elbows. It's the little things that get you.


Monday, February 8, 2010

DAY 1 - The Games Begin


Good morning readers,

It's 6:00am on Day I of Phase I of Remodeling 1070. I wanted to do a quick post before the house erupts in total chaos (just our luck that we are tearing the back half of the house to shreds at the same time our daughter comes down with the flu - chaos indeed).

We spent 14 hours yesterday preparing for the workers to arrive today. We successfully moved into the guest bedroom and emptied the master bedroom & closet and also the adjacent bedroom and closet. In the next two hours, we will empty the master bathroom and linen closet, then once the workers arrive, we will start our clean out of the main hall closet (which is a full day chore - it's sort of become the place we throw stuff that we just want out of sight and out of mind).

It's a good thing we got the 16-foot long POD storage unit, which is the largest unit the company will deliver. By the end of today, it will easily be 75% full, if not almost completely full.

As a little teaser and flash of color, I'm attaching two photos of the counter top granite slabs we have chosen for the remodeled bathrooms and kitchen. The brownish, patterned granite will be used for the kitchen counter tops, while the darker, gray-blue granite will be used for the counter tops in both bathrooms. The photos are not the vivid depiction of the colors and nuances in the stone, but they give a decent approximation. The bathroom granite is actually a bit lighter and more gray than depicted here, and the kitchen granite has a bit more red to it.

Okay, off to shower one last time in the master bath. In two hours, that part of the house will be off limits, and we still have packing and POD filling to do! More to come . . .


Friday, February 5, 2010

We're staring before the Olympics

Hello loyal followers,

The great day is almost upon us. Yes, Phase I of Remodeling 1070 is set for Monday, February 8, 2010. We beat the Olympics by four days!

The first major step towards the reality of this project happened just an hour ago. Check out the attached slide show to see the PODS storage unit being delivered. We decided that rather than move furniture and boxes from room to room during the renovations and constantly feel cramped and overcrowded, we would rent a portable storage unit for the duration of the project. The POD is in place and ready for us to fill it!

We will start this weekend by emptying out the master bedroom, bathroom and adjacent bedroom that is being incorporated into the master. We will be moving ourselves into the front guest bedroom.

Tomorrow we meet with Matt, our general contractor, to do some more shopping (we still have to narrow down the counter tops and a few other items), then it's off to get storage boxes, the home to pack the POD.

I will post again over the weekend after we get the shopping trip and the box trip behind us and give you all an update.

Let the games begin!!